How to make a Book in InDesign? Designing
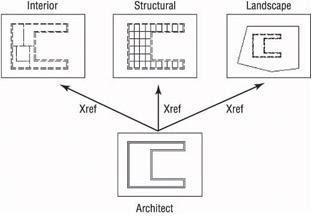
InDesign is ideally suited to working with longer documents, but longer documents are not ide ally worked upon as a single document. Rather, they are easier, faster, and more securely worked on by one or multiple compositors or designers as a series of documents connected via an InDesign Book file. A Book file, in InDesign parlance, is a connection between otherwise separate InDesign documents. That connection allows the multiple documents to be treated and managed as a single, cohesive document—a book—including page numbers that run sequentially from one to the next and the ability to preflight, print, and export to PDF all documents joined by the Book file as a single unit.
Begin a Book File
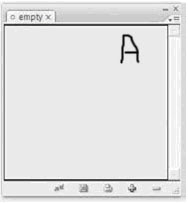
Create a new Book file by choosing File > New > Book. When prompted, specify the location and name of the INDB Book file. Typically, the Book file should be named after the project title, and saved in the same location as the documents that are or will be components of the project. When you click Save, the Book panel will appear (see Figure A).
As with the Layers panel, the major area of a Book panel is a list, in this case a list of documents. Add documents to the book by clicking the Add Documents plus button at the bottom, which will generate an Open-style Add Documents dialog. In Add Documents, browse to the InDesign documents you want to add to the book. Multiple documents may be added concurren tly using standard multiple selection modifier keys such as Cmd/Ctrl to select non-sequen tial files and Shift for sequential selections. Click Open and the selected document(s) will be added to the Book panel . Additional documents, including those in other folders or on other disks, can be added to the book the same way. The Book file, not their respective locations on disk, ties them together.
Although a Book file can only manage a single book, any given document may belong to any number of Book files. If any documents were created by earlier versions of InDesign, or are InDesign Interchange Format INX files, checking Automatic Document Conversion on the panel flyout menu will convert documents to CS3 format while adding them to the Book file. Remove documents from the book by highlighting them and clicking the Remove Document minus sign button. Save changes to the Book file by clicking the disklike icon at the bottom or choose Save Book or Save Book As from the Book panel flyout menu. To open a document that is part of a book, double-click the document in the list.
Page, Chapter, and Section Numbering
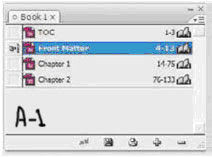
Upon adding documents to a book, the first thing you should notice is the document page numbers, which, unless you’ve specifically changed the section and nu mbering options in the individual documents, will be sequential—the numbers on the right in Figure 9.19. Each InDesign document, unless changed in the document’s Numbering & Sections Options, always begins numbering at page 1. Once booked, however, only the document first in the list begins with page number
1. Each successive document then begins numbering its pages where the previous left off. (Fig A-1)
If page numbers show on the document pages themselves, placed there with the Current Page Number special character marker on the page or master page, the page numbers will update to reflect what is shown in the Book panel. If documents, and thus page numbers, are not in the correct order, simply rearrange the documents in

the list by dragging and dropping. Page numbers will instantly resynchronize to match the new document order. They will also update to reflect any pages added to, or subtracted from, documents in the book. Fine control
over continuous or other page numbering begins with Book
Page Numbering Options, opened from the panel’s flyout menu (see Figure B).
In the Book Page Numbering Options dialog, Page Order offers a direct continuance of page numbering, continuing on the next odd, or next even, pages, and the option to insert blank pages to help with page number jumps to odd or even pages.
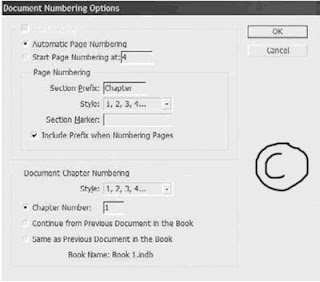
Turn off Automatically Update Page & Section Numbers to stop InDesign from automatically updating page and section numbers when documents page counts change or their order in the list is altered. With this option off, use the commands on the Update Numbering menu on the Book panel’s flyout menu to manually update page and section, chapter and paragraph, or all numbers when needed. The Document Numbering Options command on the panel menu controls page numbering and section options for a highlighted document. The Document Numbering Options dialog is nigh identical to the Numbering & Section Options dialog available on the Layout menu in any single document (see Figure C).
Automatic Page Numbering Continues numbering from the previous document in the book. If the selected document is the first, it will begin numbering from page 1, subject to the other options below.
Start Page Numbering At Choose this option and enter a number in the field to the right to begin numbering pages in the document at a certain point.
Section Prefix The Section Prefix field enables you to propend up to eight characters—letters and/or numbers—to section numbers. For instance, enter Part- here to create page numbering and TOC entries such as Part-X Page Y.
Style Choose the style for section numbers, either Arabic or upper- or lowercase Roman or alphabetic.
Section Marker Documents may be divided into multiple sections—for instance, in this book, there are sections for front matter pages, the TOC, the chapters, the glossary, and the index. Each section of a publication may be numbered or formatted differently, and the page number may also be prefixed with a section-specific bit of information like Section 1: Page 19. To insert a section marker in a text frame—say, in the folio beside the page number—place the Type tool cursor in the appropriate place in the text frame and choose Type > Insert Special Character > Markers > Section Marker. The section marker that appears will be specific to that section. What you enter in the Section Marker field is what appears as the section marker inserted into a text frame. For instance, to identify the glossary of a book, you may enter Glossary. When the section marker appears on the page, it will then display as Glossary in the folio, header, or wherever you’ve placed the marker. If the Include Prefix when Numbering Pages box is checked, it will also insert the section marker as part of automatic page numbers created using Type > Insert Special Character > Markers > Current Page Number.
Document Chapter Numbering Although a single document may contain several sections, it may only contain, or be, a single chapter. In this section, choose the format of chapter numbering, the chapter number for the current document, and whether to continue growing from, or mirror, the chapter number of the previous document in the book. The latter option is used to define two or more documents at being part of the same chapter. Chapter numbers are made visible on the page by inserting the Chapter Number text variable ( some other time I
Tables of Contents
Creating a table of contents for the document (or book) is far less involved than creating an index, as long as you practiced efficient composition by assigning paragraph styles to the elements that should be listed within the TOC. The basis for TOC generation is paragraph styles—in other words, any text assigned to this style or that style will be included or excluded based solely on its paragraph style. InDesign supports an unlimited number of
tables of contents. Thus, you can create the standard document TOC like the one at the front of this book, but you can also create per-chapter tables of contents, lists of figures or tables, alphabetized lists of topics, and just about anything else you can imagine (and manage with paragraph styles). Begin creating the table of contents by choosing Layout > Table of Contents, which opens the Table of Contents dialog (see Figure D). Click the More Options button to reveal the full depth of the dialog.
TOC Style All of the options incorporated into the Table of Contents dialog may be saved as a preset called a TOC style. After setting the options, click the Save Style button on the right and give the style a name. TOC styles can also be created and edited from Layout > Table of Contents Styles. If a style has been pre-created, it will appear in the TOC Style list; choose it, and all the below options will fill in with their style-defined values.
Title When the TOC is generated and placed, it will have a title as the first line of the story. By default, the title will be Contents, but it can be anything you like. Leaving the Title field blank removes the title from the generated TOC entirely, without leaving a blank carriage return where it would have been.
Style The paragraph style for formatting the TOC title.
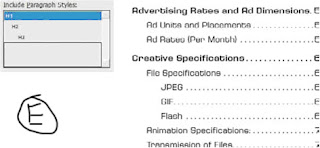
Styles in Table of Contents This is the crux of creating a TOC. On the right, in the Other Styles list, are all the paragraph styles defined in the document. Click a style on the right to highlight it, then use the Add button to move it to the left, the Include Paragraph Styles list. You can also double-click an entry in either column to move it to the other. Each style included on the left will cause all text assigned to that style to be listed in the resulting TOC; styles not in the list will not have their dependent text referenced by the TOC. The order of styles in the Include list establishes the TOC hierarchy. In other words, the first listed style is the most important, highest level of the generated TOC, with the next appearing below it, the next below that, and so on. If you insert styles in the wrong order, drag them up or down in the list just as you reorder styles in the Paragraph or Character styles panels. But you must also change their Level value in the Style section below.(Figure E) shows an example of the Include Paragraph Styles list and the TOC it would generate.
Click to highlight a style in the Include Paragraph Styles to set its options below in the Style section. Each included style may have its own entry style, page number options, and so on.
Entry Style When the TOC is generated, the text for each entry level can have its own paragraph style. Unlike index styles, InDesign will not automatically created level-based paragraph styles. You’ll need to pre-create your TOC styles and then select them from the list for each Include Paragraph Style option. Alternatively, leave the default of [Same Style] to include the same style in the TOC as on the document pages.
Page Number Choose whether to place the page number before or after the entry text or to omit the page number entirely. With the Style field to the right, the page number can be given its own character style for customized formatting.
Between Entry and Number The separator character or characters to appear between the entry text and its number (or number and text, if the page number is placed before the text). The pop-up menu to the right offers many symbols, markers, and special characters. To create a leader dot separator, specify a tab (^t) in the field and then modify the paragraph style (outside of the Table of Contents dialog) to include a leader dot separator at that tab stop. The dropdown menu at the right allows assigning a character style to the separator itself, enabling any unique styling to be applied to just the separator.
Sort Entries in Alphabetical Order By default, and in most cases, TOC entries are sorted in order of appearance in the document. However, especially when creating documents for electronic distribution as PDFs, this option opens numerous other possible uses for the Table of Contents feature beyond creating a standard TOC. When InDesign generates a TOC, it creates hyperlinks connecting the TOC entries to the text they reference. Exporting to PDF preserves these hyperlinks, enabling a reader of such a PDF to click on the TOC entry and jump to the content. Thus, the option to sort entries alphabetically rather than logically opens the possibilities of creating vastly different lists such as lists of product names, personnel referenced in the document, or even a replacement for a standard index—without having to manually create index entries. The only significant limitation to using the Table of Contents functions in place of index and other features is that InDesign’s Table of Contents is dependent upon paragraph styles; it cannot create an entry from a character style or a specific word in the middle of a paragraph.
Level In a hierarchal TOC such as the one at the front of this book, entries from each successive style are considered inferior to their predecessors—Heading 1, for instance is superior to Heading 2, which is superior to Heading 3. The Level field defines that hierarchy. As each style is moved from the Other Styles list to the Include Paragraph Styles list, InDesign automatically assigns a successive level. If you have reordered the include list by dragging and dropping, you will also need to change the level for each affected style. Often successive TOC entries are indented as visual cues to the hierarchy. The Include list mimics the hierarchy by indenting styles in the list, giving you a visual representation of how the generated TOC may look. The Level field is nonexclusive, meaning that you are not required to have only a single level 1 or level 2 entry. If you have two or more equally important styles, they can all be set to the same level.
Create PDF Bookmarks Similar to the way each entry on the page itself will be hyperlinked to its content, InDesign can automatically generate PDF bookmarks, which are hidden until PDF export time. Adding these, and choosing to include bookmarks when exporting to PDF, creates something akin to Figure 9.38—a Bookmarks panel sidebar TOC-style list of topics that, when clicked in Acrobat or Adobe Reader, become hot links and jump the reader to the referenced content.
Replace Existing Table of Contents If you have previously generated and placed a TOC, this option will replace (not update) it. When using the Table of Contents to build separate styles of tables, you want this option unchecked.
Include Book Documents When generating a TOC for documents managed through an InDesign Book file, check this option to generate a single TOC that points to all instances of the included paragraph styles in all documents within the book.
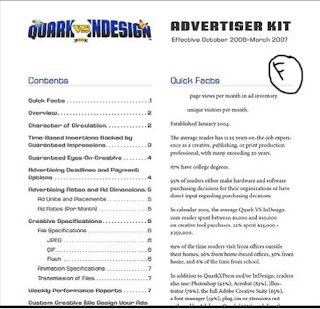
Run-In By default, all TOC entries are given their own line, with a carriage return at the end. An alternate style is to use the run-in method that, like the same option within an index, only separated by top-level styles. All entries lower in the hierarchy than the top will be placed together in a paragraph (see Figure F).
Include Text on Hidden Layers Choose whether to include in the TOC text on hidden layers.
Numbered Paragraphs New to CS3, this option tells InDesign how to handle paragraphs that have been numbered through the List and Numbering functions. Note that InDesign does not recognize numbers that have been converted to standard text and will include them in the TOC regardless of this setting. The options are as follows:
Include Full Paragraph lists the text in the TOC exactly as it appears on the page, with all text automatic numbering intact. For example, the ninth table in a chapter whose number is defined within the paragraph Numbering options to include the prefix Table 9 and whose table caption is KDY Capital-Class Products will list in both the main story and the TOC as Table 9.9 KDY Capital-Class Products.
Include Numbers Only ignores the text in the paragraph and includes only the automatic number and any prefixes. For example, to include a TOC entry for Table 9.9 without the table’s caption, choose Include Numbers Only.
Exclude Numbers includes in the TOC the text of the paragraph but not the automatic number. The TOC output using the above example would therefore be simply KDY Capital- Class Products. Click OK to return to the document with a loaded cursor ready to place the TOC story, which may be placed and flowed like any story. If any stories in the document contain overset text assigned to the included styles, you will be prompted after clicking OK whether to include those instances in the TOC. Unlike an index, tables of contents don’t have their own panel. Also unlike an index, you needn’t go through the entire generate process to update a TOC. Instead, select a text frame holding the TOC style, and choose Layout ➢Update Table of Contents. Shortly, an alert dialog will inform you that the table of contents has been updated successfully. When creating a comprehensive TOC for book documents, it’s often better to place the TOC into its own self-contained document and to add that document to the Book panel.
The Bottom Line
Interact with Documents Visually, Change Zoom Level, View Modes, and Display Performance
InDesign provides numerous means of changing the way you interact with documents, how fast they move, how you see them, and what you see.
Master It Open any InDesign document containing text and images on the same page. Open three different views of the same document, arranged simultaneously onscreen, zooming all to fit the page within the document window, and compare the views according to the following options:
View 1: Preview mode with High-Quality Display display performance.
View 2: Layout mode with Fast Display display performance.
View 3: Bleed mode with Typical Display display performance.
Build and Manage Grids and Guides The foundation of any well-laid-out document is a well thought- out grid.
Master It Create a new document and build a grid on the master page consisting of six equal columns and three equal rows within the page margins. Once that’s done, apportion the top row into three equal sections.
Create and Manage Book Files Often one person finds it easier to work on longer documents by breaking them up into chapters or sections and connecting them via a Book file. For workgroups wherein different people are responsible for different sections of the document, a Book file is essential to productivity.
Master It Working alone or in a group, create at least three InDesign documents of several pages of text each. Save each document, and then create a Book file to connect the documents. Finally, create a single PDF from the entire book.
Index Terms and Create an Index An index helps readers find content. From simple keyword lists to complex, multilevel, topic-driven indices, InDesign handles them all, marrying index entries to referenced text through index markers.
Master It Open or create an InDesign document containing a story of at least three pages in length. Working through the document, create index entries and cross-references for at least 10 words, one of which should be a word that repeats numerous times throughout the story (use a common word such as the if needed). Once the terms are indexed, generate and place the index story on a new page.
Create Tables of Contents Tables of contents direct readers in logical or virtually any order to content, and InDesign’s TOC options are varied and powerful for myriad uses.
Master It Open or quickly create a rudimentary book-style document containing body text and several heading paragraphs utilizing at least two levels of headings. Create and assign paragraph styles for the body text and headings. Using what you’ve learned in this chapter, generate and place a hierarchal TOC.I get this Tutorial from http://profesorazii.blogspot.com
This is really good article