How to Copy and Paste in InDesign?
A. Copy and Paste
Naturally, you can copy frames and their content, together or separately, from within InDesign and paste elsewhere within InDesign. You can copy type from the middle of a story and paste it, too. I won’t waste your time talking about something as academic as that. I would like to spend a few paragraphs discussing what can and can’t be copied into InDesign from other applications and some of the things to watch out for when doing that.
InDesign’s drawing tools are perfect for most common drawing tasks. When you need something a little more robust, however, haul out Illustrator. When you do that, you have a choice: Save the Illustrator file and place it into InDesign as an asset, or simply copy the artwork from Illustrator and paste into InDesign. Both methods works, and each has its pros and cons. InDesign understands vector paths and basic shapes about as well as Illustrator, and, more importantly, InDesign is wise enough to recognize when something—in this case, Illustrator—is more knowledgeable than itself. Take, for instance, live effect 3D objects created in Illustrator. InDesign is a page layout application; it has no concept of 3D space beyond x and y coordinates and basic stacking order.
Draw a path in Illustrator, apply a 3D Revolve effect to spin the path into a vase or ashtray, and the path remains infinitely editable (because it’s a nondestructive effect in Illustrator). InDesign, however, doesn’t have a 3D Revolve effect, has no concept of lighting—three-dimensional or otherwise—and just doesn’t get it. Consequently, you might expect that copying the 3D object from Illustrator and pasting into InDesign would result in just the original path, sans 3D, in InDesign. Fortunately, if that’s what you expected, you’d be wrong.
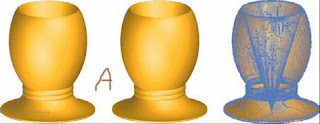
In Figure A, you can see three versions of an urn. In Illustrator, I drew a relatively simple path (highlighted on the left) and revolved it into a 3D urn. This is a live effect—I can change the path at any time and the 3D Revolve effect will update the three-dimensional shape to match my changes. The center version is the same object copied from Illustrator and pasted into InDesign. Notice how it looks identical? What really happened is that the 3D effect was converted to flat paths, maintaining the object’s appearance by sacrificing the reality. If I ungrouped the paths in InDesign, I’d be left with hundreds of little slivers, which you can see as individual paths in the picture on the right. That one is the object copied in InDesign and pasted back into Illustrator. The ability to edit the 3D shape easily is gone; if I needed to change the shape or color of the urn, I’d have to spend hours doing it. In this case, I’d re-create the object from scratch, hoping I remembered or could re-create the exact 3D Revolve settings, light source positions, and so on. Odds are, it would take me less than five minutes to re-create the urn; with something complicated, though, I could be looking at hours or days worth of redrawing time just because I thought copy and paste would be faster initially.

There’s the pro and the con: You can copy native objects from Illustrator and have them become native objects in InDesign—no rasterization. Draw a couple of rectangles or stars in Illustrator, paste them into InDesign, and you can edit their paths further there. You can also change their colors and transparency, move around the constituent objects in a group pasted in, and so on. However, if you get something InDesign doesn’t understand—like the 3D urn— InDesign will make it understandable and could thereby reduce or eliminate your ability to later edit the object.
If it takes more than 1 minute to draw in Illustrator, I’ll save the AI file and place it rather than copy and paste to InDesign. I would much rather retain editability of a drawing than worry about managing one more external asset.
The same is true of Photoshop images. While you can copy and paste from Photoshop to InDesign, and it’s great for little bits here and there, you lose a lot. The first to go is transparency; pasted images are flattened onto a white background. Not even InDesign’s Object>Clipping Path>Option command will get rid of the white. The same is true if you drag one or more layers from Photoshop and drop them into InDesign. Other things to watch out for include transparency—Illustrator transparency flattens upon paste or drag into InDesign—and color. Both Illustrator and Photoshop support color models InDesign does not, like Web-Safe RGB, HSL, and Grayscale. The latter will become tints of process black (the K in CMYK), while the former two will convert to the RGB color space. Spot colors survive unless they’re from a library InDesign doesn’t have, such as Visibone2, in which case they’re-converted to the nearest match CMYK process values. Simple Illustrator gradients—linear, radial— will convert to InDesign gradients and may be edited after paste, but more complicated ones or gradient meshes become individual vector paths in InDesign (think of the urn). Illustrator patterns become embedded EPS images and are no longer editable.
Objects or elements coming into InDesign via paste or drag and drop will be permanently converted, whereas placed assets only appear within InDesign using that application’s supported color models; the actual colors and spaces will survive unchanged inside the external assets and thus through to output. This can also be a gotcha: An image saved in HSL (Hue, Saturation, Luminosity) will look RGB in the layout, enticing you to forget that the asset is not RGB, and may later cause problems with a RIP that doesn’t know how to convert from HSL. Preflight and Package for Print will pick up on the color space and alert you, though, so keep an eye on those.
Text from nearly any application—including Photoshop and Illustrator—can be pasted into (or from) InDesign, though, by default, text will lose its formatting upon paste. Back on the Clipboard Handling pane of InDesign’s Preferences, you can change that behavior by toggling the setting for When Pasting Text and Tables from Other Applications to All Information instead of the default Text Only.
Other Flavours of Paste
No, I don’t mean to discuss the chunky white bottled paste we found so delicious as pre-nap snack in kindergarten. I mean Paste without Formatting, Paste Into, and Paste in Place. They aren’t strictly for getting assets into InDesign, but at this point in the discussion, they are relevant. When the Clipboard Handling preference is changed to preserve formatting, swatches, styles, and so forth on pasted text, there is a way to override it and paste unformatted text per instance.
This same method is very helpful for copying and pasting from one place or document in InDesign to another.
On the Edit menu is the Paste without Formatting command. Instead of using Cmd+V/Ctrl+V to execute a normal paste, use Cmd+Shift+V/Ctrl+Shift+V to paste text without any formatting. Pasted text will then take on the attributes assigned to the frame or surrounding text, including style, formatting, color, and so on. Just below that command is Paste Into, which is a nifty command to know when you want to accomplish one of these tasks:
> Paste one container (with or without content) inside another container
> Move or copy an image (or text) from one frame to another without having to go through a fresh place routine
>Clip or mask a group of objects by pasting into a frame in the shape of the desired mask
Next is Paste in Place. Copy an object, then choose Paste in Place to put a duplicate directly above, and perfectly aligned with, the original (there is no Paste Behind as in Illustrator). Also, less obvious, is that Paste in Place doesn’t so much paste one copy atop the original as it does paste the copy in the exact same place as the original. Huh? Six of one thing, half dozen of the other. No, it’s not the same thing. Copy an object. Now, go to the next page. Paste with a standard Cmd+V/Ctrl+V. What happens? The pasted object shows up dead center of the document window. Change your view— scroll around, zoom—and paste once more; again, the object is dead center of the document window. Now, paste in place instead. The copy is pasted at the exact same coordinates as its original, the source from which the copy was made. The advantage to using Paste in Place instead of a standard Paste (or Edit >Duplicate for that matter) is that it does almost the same thing, but there’s no need to also manually position the copy. You can run through an entire document, blindly using the paste in place keyboard shortcut, and know that the object is inserted in the exact same position on every page
Naturally, you can copy frames and their content, together or separately, from within InDesign and paste elsewhere within InDesign. You can copy type from the middle of a story and paste it, too. I won’t waste your time talking about something as academic as that. I would like to spend a few paragraphs discussing what can and can’t be copied into InDesign from other applications and some of the things to watch out for when doing that.
InDesign’s drawing tools are perfect for most common drawing tasks. When you need something a little more robust, however, haul out Illustrator. When you do that, you have a choice: Save the Illustrator file and place it into InDesign as an asset, or simply copy the artwork from Illustrator and paste into InDesign. Both methods works, and each has its pros and cons. InDesign understands vector paths and basic shapes about as well as Illustrator, and, more importantly, InDesign is wise enough to recognize when something—in this case, Illustrator—is more knowledgeable than itself. Take, for instance, live effect 3D objects created in Illustrator. InDesign is a page layout application; it has no concept of 3D space beyond x and y coordinates and basic stacking order.
Draw a path in Illustrator, apply a 3D Revolve effect to spin the path into a vase or ashtray, and the path remains infinitely editable (because it’s a nondestructive effect in Illustrator). InDesign, however, doesn’t have a 3D Revolve effect, has no concept of lighting—three-dimensional or otherwise—and just doesn’t get it. Consequently, you might expect that copying the 3D object from Illustrator and pasting into InDesign would result in just the original path, sans 3D, in InDesign. Fortunately, if that’s what you expected, you’d be wrong.
In Figure A, you can see three versions of an urn. In Illustrator, I drew a relatively simple path (highlighted on the left) and revolved it into a 3D urn. This is a live effect—I can change the path at any time and the 3D Revolve effect will update the three-dimensional shape to match my changes. The center version is the same object copied from Illustrator and pasted into InDesign. Notice how it looks identical? What really happened is that the 3D effect was converted to flat paths, maintaining the object’s appearance by sacrificing the reality. If I ungrouped the paths in InDesign, I’d be left with hundreds of little slivers, which you can see as individual paths in the picture on the right. That one is the object copied in InDesign and pasted back into Illustrator. The ability to edit the 3D shape easily is gone; if I needed to change the shape or color of the urn, I’d have to spend hours doing it. In this case, I’d re-create the object from scratch, hoping I remembered or could re-create the exact 3D Revolve settings, light source positions, and so on. Odds are, it would take me less than five minutes to re-create the urn; with something complicated, though, I could be looking at hours or days worth of redrawing time just because I thought copy and paste would be faster initially.

There’s the pro and the con: You can copy native objects from Illustrator and have them become native objects in InDesign—no rasterization. Draw a couple of rectangles or stars in Illustrator, paste them into InDesign, and you can edit their paths further there. You can also change their colors and transparency, move around the constituent objects in a group pasted in, and so on. However, if you get something InDesign doesn’t understand—like the 3D urn— InDesign will make it understandable and could thereby reduce or eliminate your ability to later edit the object.
If it takes more than 1 minute to draw in Illustrator, I’ll save the AI file and place it rather than copy and paste to InDesign. I would much rather retain editability of a drawing than worry about managing one more external asset.
The same is true of Photoshop images. While you can copy and paste from Photoshop to InDesign, and it’s great for little bits here and there, you lose a lot. The first to go is transparency; pasted images are flattened onto a white background. Not even InDesign’s Object>Clipping Path>Option command will get rid of the white. The same is true if you drag one or more layers from Photoshop and drop them into InDesign. Other things to watch out for include transparency—Illustrator transparency flattens upon paste or drag into InDesign—and color. Both Illustrator and Photoshop support color models InDesign does not, like Web-Safe RGB, HSL, and Grayscale. The latter will become tints of process black (the K in CMYK), while the former two will convert to the RGB color space. Spot colors survive unless they’re from a library InDesign doesn’t have, such as Visibone2, in which case they’re-converted to the nearest match CMYK process values. Simple Illustrator gradients—linear, radial— will convert to InDesign gradients and may be edited after paste, but more complicated ones or gradient meshes become individual vector paths in InDesign (think of the urn). Illustrator patterns become embedded EPS images and are no longer editable.
Objects or elements coming into InDesign via paste or drag and drop will be permanently converted, whereas placed assets only appear within InDesign using that application’s supported color models; the actual colors and spaces will survive unchanged inside the external assets and thus through to output. This can also be a gotcha: An image saved in HSL (Hue, Saturation, Luminosity) will look RGB in the layout, enticing you to forget that the asset is not RGB, and may later cause problems with a RIP that doesn’t know how to convert from HSL. Preflight and Package for Print will pick up on the color space and alert you, though, so keep an eye on those.
Text from nearly any application—including Photoshop and Illustrator—can be pasted into (or from) InDesign, though, by default, text will lose its formatting upon paste. Back on the Clipboard Handling pane of InDesign’s Preferences, you can change that behavior by toggling the setting for When Pasting Text and Tables from Other Applications to All Information instead of the default Text Only.
Other Flavours of Paste
No, I don’t mean to discuss the chunky white bottled paste we found so delicious as pre-nap snack in kindergarten. I mean Paste without Formatting, Paste Into, and Paste in Place. They aren’t strictly for getting assets into InDesign, but at this point in the discussion, they are relevant. When the Clipboard Handling preference is changed to preserve formatting, swatches, styles, and so forth on pasted text, there is a way to override it and paste unformatted text per instance.
This same method is very helpful for copying and pasting from one place or document in InDesign to another.
On the Edit menu is the Paste without Formatting command. Instead of using Cmd+V/Ctrl+V to execute a normal paste, use Cmd+Shift+V/Ctrl+Shift+V to paste text without any formatting. Pasted text will then take on the attributes assigned to the frame or surrounding text, including style, formatting, color, and so on. Just below that command is Paste Into, which is a nifty command to know when you want to accomplish one of these tasks:
> Paste one container (with or without content) inside another container
> Move or copy an image (or text) from one frame to another without having to go through a fresh place routine
>Clip or mask a group of objects by pasting into a frame in the shape of the desired mask
Next is Paste in Place. Copy an object, then choose Paste in Place to put a duplicate directly above, and perfectly aligned with, the original (there is no Paste Behind as in Illustrator). Also, less obvious, is that Paste in Place doesn’t so much paste one copy atop the original as it does paste the copy in the exact same place as the original. Huh? Six of one thing, half dozen of the other. No, it’s not the same thing. Copy an object. Now, go to the next page. Paste with a standard Cmd+V/Ctrl+V. What happens? The pasted object shows up dead center of the document window. Change your view— scroll around, zoom—and paste once more; again, the object is dead center of the document window. Now, paste in place instead. The copy is pasted at the exact same coordinates as its original, the source from which the copy was made. The advantage to using Paste in Place instead of a standard Paste (or Edit >Duplicate for that matter) is that it does almost the same thing, but there’s no need to also manually position the copy. You can run through an entire document, blindly using the paste in place keyboard shortcut, and know that the object is inserted in the exact same position on every page
You might also like: i get this Tutorial from
http://profesorazii.blogspot.com
http://profesorazii.blogspot.com
